Open-Pryv.io template for Exoscale
On this page you will find all the necessary information to deploy Open Pryv.io from Exoscale’s Marketplace.
Please read the following document before launching your first instance.
(requires an exoscale account)
Preparation
Hostname
A hostname to be associated with the machine (DNS A record) is required to set-up the SSL termination to the service.
During the installation, you need to know the hostname to be assigned to this machine. The setup process will wait for the IP address to be assignated to an A record on your DNS to be completed.
Firewall rules
To create new Firewall rules, go to COMPUTE>FIREWALLING and then click on the ADD button. You can create the group pryv and click on CREATE. You can then select the group pryv and add new rules as shown on the screenshot below.

- TCP 443 is necessary for HTTPS
- TCP 80 is handy for HTTP to HTTPS redirection
- TCP 22 is used for SSH
Create Instance
Select “Open Pryv.io” in the template list and adapt the instance type as per your needs.
Then select the Security Group pryv and copy the whole content of the snippet (you need to include #cloud-config) below replacing ${HOSTNAME}, ${SECRET_KEY} and ${EMAIL} in the field User Data of the form.
- ${HOSTNAME} : Hostname on which your Open-Pryv.io platform is exposed. You will need to define a DNS A record for this hostname.
- ${SECRET_KEY} : This key must be randomly generated and is used as the admin access key.
- ${EMAIL} : This email is only used by Letsencrypt to give you information about your certificate and for recovery purposes (Link to Letsencrypt).
#cloud-config
write_files:
- content: |
    {
      "HOSTNAME": "${HOSTNAME}",
      "EMAIL": "${EMAIL}",
      "KEY": "${SECRET_KEY}"
    }
  path: /tmp/conf/config.json

runcmd:
 - node /home/ubuntu/setup.js
DNS Record
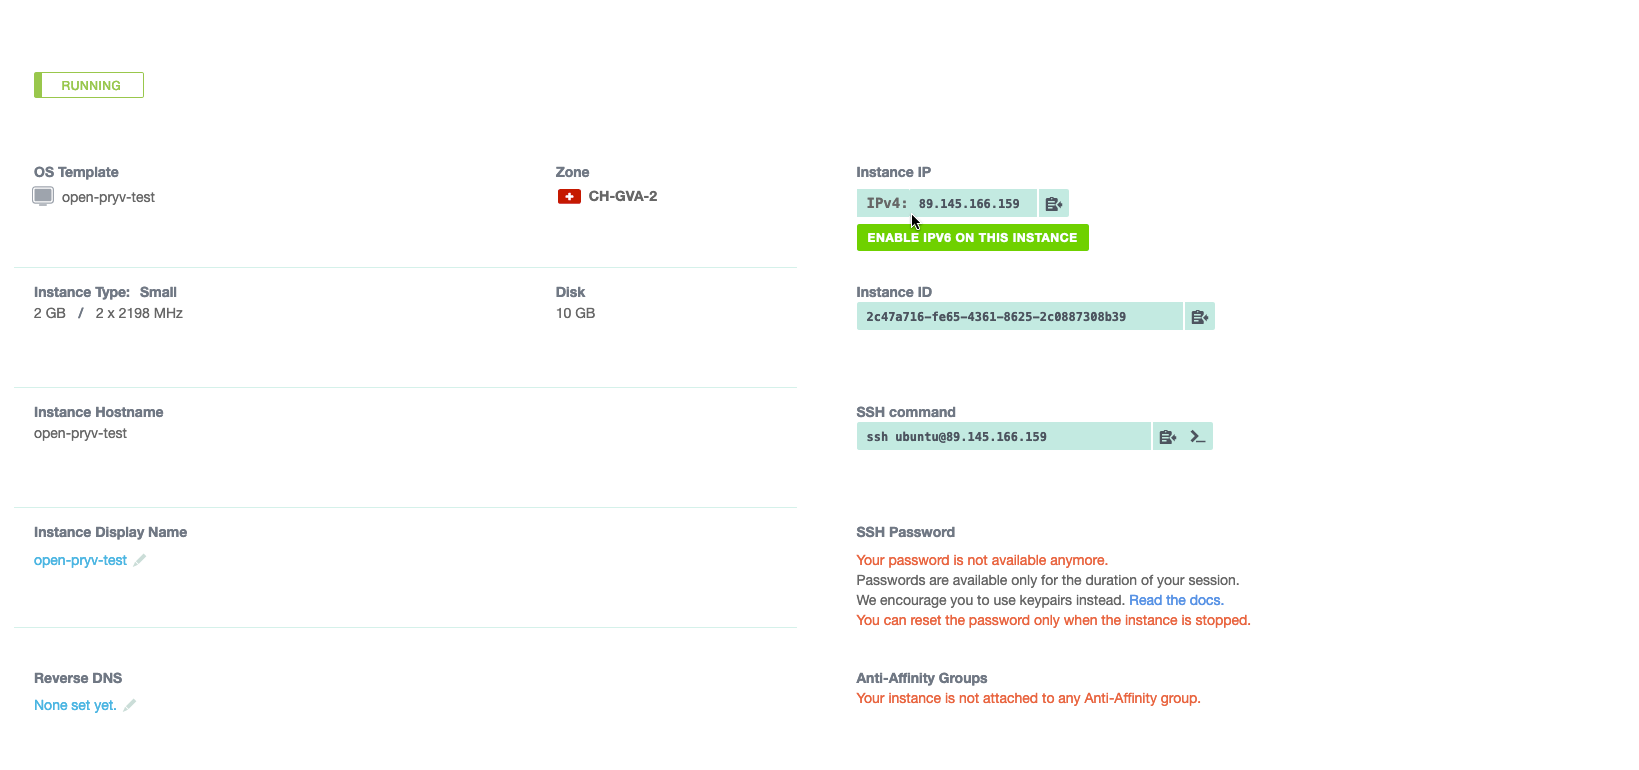
Once your machine is started, look at the IP address attributed to your machine (see screenshot below) and create an A record in your DNS zone with the ${HOSTNAME} you furnished before.
Log
The first boot can take up to 10 minutes.
To follow the set-up process, connect in ssh inside your VM and read the log file /home/ubuntu/setup.log.
tail -f /home/ubuntu/setup.log
During the setup phase, the script will wait until you add the DNS A record.
Verify
Your Open Pryv.io platform is now running at https://${HOSTNAME}/.
You should get a service information similar to the one below:
{
  "meta": {
    "apiVersion": "1.5.24-open",
    "serverTime": 1601379119.307,
    "serial": "t1591793506"
  },
  "cheersFrom": "Pryv API",
  "learnMoreAt": "https://api.pryv.com/"
}
Follow these steps to start using the platform: Open Pryv.io - Start.
Next steps
You can customize your Open Pryv.io platform and configure company email by following the README of the git repo of Open-Pryv.io.